How to burn an engine, or harmful tips for operating an electric motor

If you've set out to burn an electric motor, you're in luck; a motor is not the most reliable element in an electric drive, and it's not a big deal to break it. However, to save you time, we have collected the most effective tips that have been tested by time and experience of both ordinary users and professionals.
Before buying
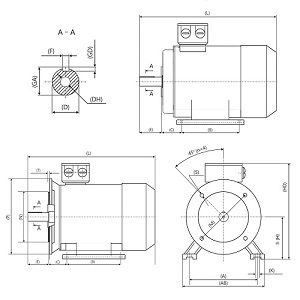
each motor has a number of unique
dimensions and connection dimension
When choosing an electric motor, the main thing is to save money. Therefore, if your mechanism requires a 4 kilowatt motor, it is better to buy a weaker (and cheaper!) one, for example, 3 or even 2.2 kilowatts. Will it pull? Of course it will. If you don't believe me, just ask any concrete builder. In a concrete mixer designed for 20 liters, they pour about 30 liters of water alone. Plus a bag of cement, plus sand, plus gravel. If the container with all this good stuff can't make a full turn, they simply help it spin with their hands. You get the idea. A weaker engine will pull; and if it doesn't, you can help it with your hands (and save a lot of money).
Secondly, never choose a motor according to the rotor speed specified by the developer. For example, if your machine needs a 1500 rpm electric motor, then don't fool yourself and take any available one - 3000, 1000 or even 750 rpm. And don't worry that the electric motor will do twice as much work. We guarantee that the motor will fail much faster. Be creative in the end!
Also, we do not recommend specifying the motor mounting dimensions; you can install a motor of any size in the mechanism. If it does not fit, a grinder or sledgehammer will help.
Installation
So you have finally purchased the engine, it's time to install it correctly.
Remember the first rule - more heat is needed to burn the engine. So we install it in a small, enclosed space to reduce airflow. You can even wrap it up with something. Better yet, you can change the cooling impeller to a smaller one or remove it altogether. Then your engine is being modernized into a two-shaft engine. One shaft in the front and the other in the back, where the fan used to be. Genius! How about that, Elon Musk?
The second rule is the pulley attachment. If you need to put the pulley on the motor shaft, then forget about various clever tips; "graphite grease", "hit with light blows through a special gasket" - this is not for you. Your main tool is a sledgehammer!
How hard should you hit it? That's right, the harder the better. The ideal variant is when, after hitting the shaft, the rotor breaks out the rear bearing shield and falls out on the other side.
If you are not lucky and after all the torture your engine has not broken down, then proceed to the next step…
Connection
What to do with the engine at this stage? That's right, we don't connect it correctly.
The first thing we should try to do is to place the mechanism with the motor as far as possible from the power point; so that the length of the cable allows us to create a current drop. And since we have already touched on the topic of cable, we take the cheapest and much thinner one than recommended by GOST (cable recommendations for three-phase motors in the table below).
|
Motor power |
Cross-section of core (copper) |
| up to 4kW | 1,5 mm2 |
| 4kW – 5,5kW | 2,5 mm2 |
| 5,5kW – 7,5kW | 4 mm2 |
| 7,5kW – 11kW | 6 mm2 |
| 11kW – 15kW | 10 mm2 |
| 15kW – 18,5kW | 16 mm2 |
| 18,5kW – 22kW | 25 mm2 |
| 22kW – 30kW | 35 mm2 |
| 30kW – 37kW | 50 mm2 |
| 37kW – 45kW | 70 mm2 |
| 45kW – 55kW | 95 mm2 |
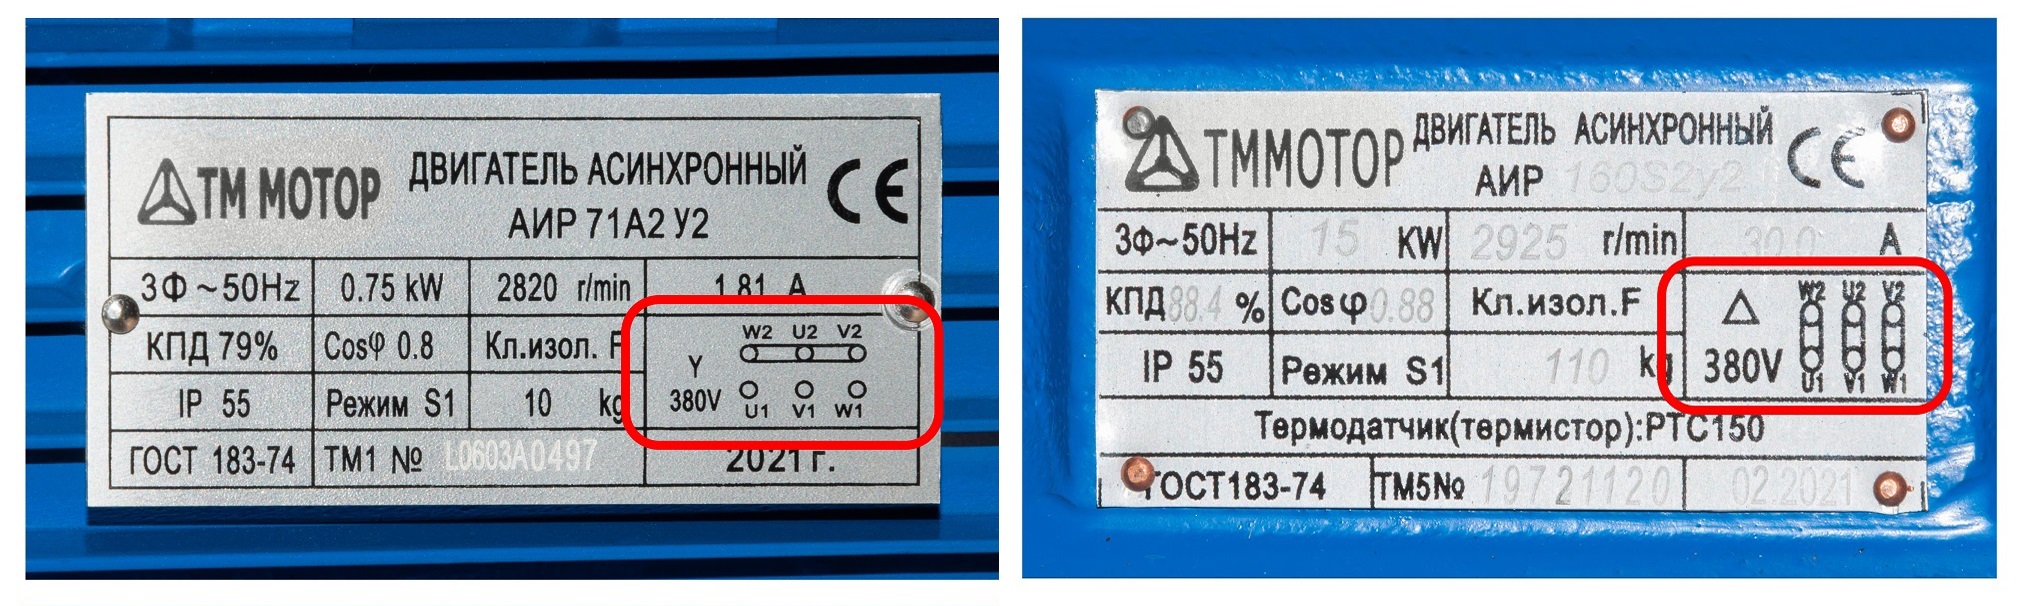
Connection diagram? Absolutely not. We don't even look at the nameplate (which indicates whether the motor is connected in a "delta" or "star"). The real story:
Well, let's not argue with the older generation and put all the motors in the "star". It seems to have worked out well.
The final touch is that we will not solder or add lugs to the cable ends that are connected to the terminal panel. We'll just press them down with washers so that they loosen up over time and maybe even fall off. They say that "patches" are in fashion now.
Motor protection? Absolutely not. Spending money on thermal relays, on protection against skew and phase loss... No, and no more. That's not why we're here..
After all of our advice, you turned on your electric motor and it's still running? Strange... Let's fix it. Let's move on to the next step.
Exploitation
Life hack number one. See GOST 183-74. S1 operating mode "engine on/off no more than twice an hour". Turn on the engine, turn it off after two minutes. Turn it on again. And then turn it off again. And so on 74 times in an hour. It's really quite fun.
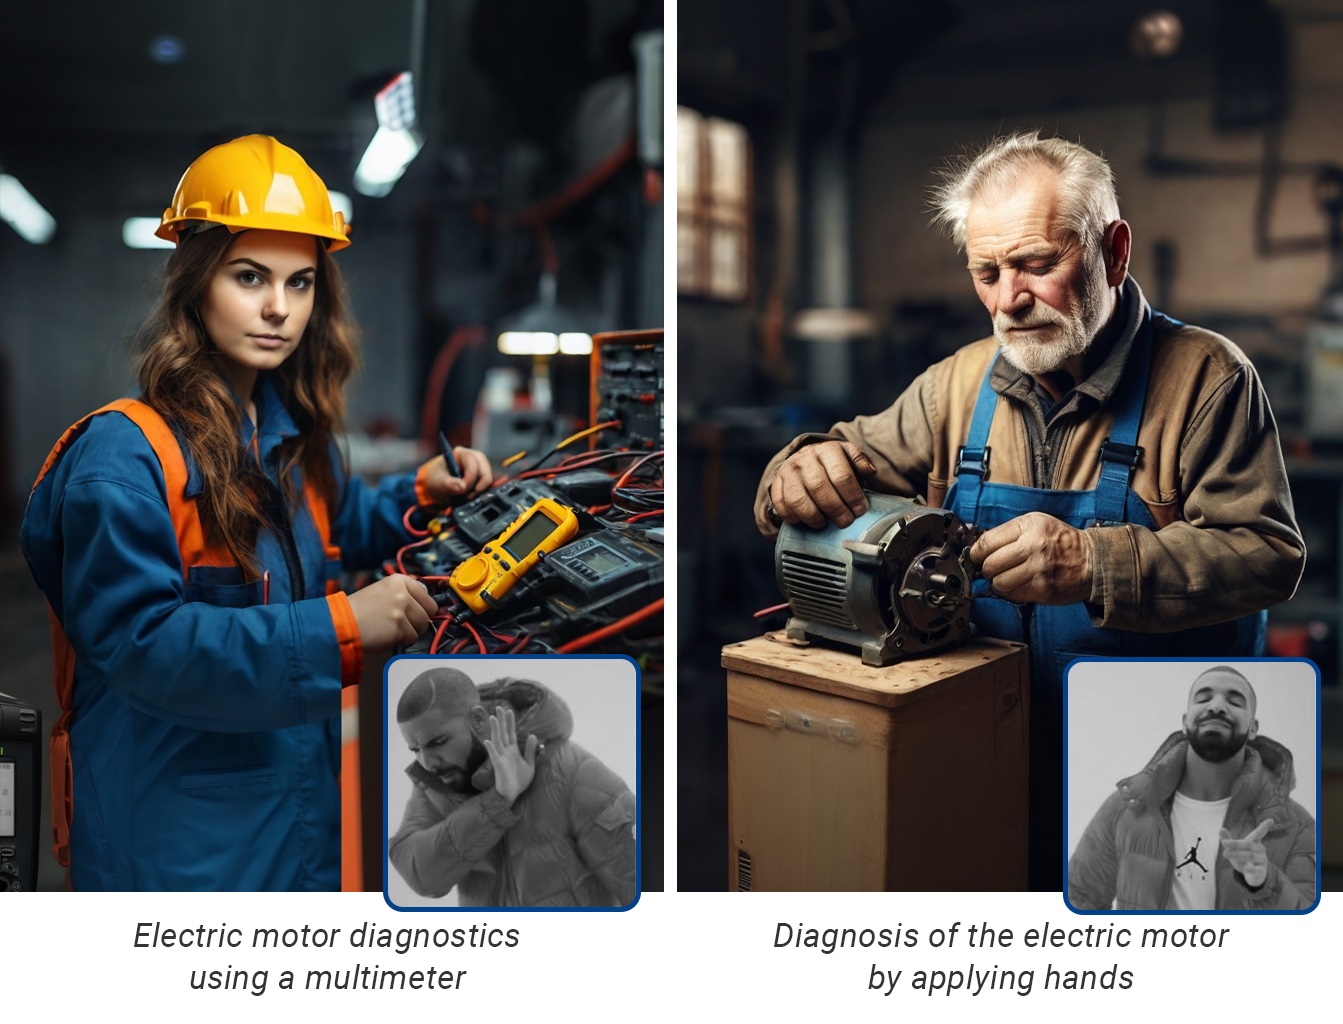
Life hack number two. When the motor is running, we use our hands to take measurements such as temperature, amperage, and vibration. All those multimeters, clamp meters, and other stuff are just a waste of money. Do you think we are joking? We are not joking at all. Half of the engine owners do exactly that. What's wrong with you? You put your hands on the engine and determine its temperature, vibration and idling current. Nostradamus wasn't even close.
Also, do not forget (or rather forget) to add grease to the bearing after 9000 hours of operation. We'll save money and the engine will start chirping with new octaves.
If the engine doesn't burn out even after that, just take it out in the rain without a canopy and leave it for a few weeks. It will definitely fail. We guarantee.
After a failure
Finally, your engine has burned out, broken down, or simply failed. What should you do next? It's simple - call the seller right away and prove that you had nothing to do with it. We have selected the TOP 3 best excuses for you:
- «I didn't do anything, it broke by itself»
- «We just plugged it in and it immediately burned down»
- «But we didn't even connect it, we just took it out of the box and it caught fire in my hands»
*This article is informative and entertaining and is intended to draw the attention of owners to the basic rules for operating electric motors.
Promelectro LLC and the TM Motor trademark wish your engines a long service life and proper maintenance.